Thursday, November 19, 2009

New Solid Framework released

We have released a new version (6.0.251) of Solid Framework SDK that now includes full support for image processing and optical text recognition to allow conversion of scanned PDF files to editable Word documents. Solid Framework takes advantage of the MODI API (part of Microsoft Office) to provide OCR capability.

When converting PDF to Office documents, you can specify when OCR is used by setting the TextRecoveryType:


To one of the following settings:


Always - All pages are rendered to images and processed as scanned pages.

Automatic - Pages that contain scanned text-like images are recognized automatically.

Default - Same as Automatic.

Never - No scanned page processing. Scanned pages converted as images.

Friday, September 4, 2009

Convert PDF pages to Image files

Another comment question we get in email is if Solid Framework can convert PDF pages into image files. Solid Framework can be used to convert PDF pages into image files, and we use this feature to create page thumbnail images and the main page view for PDF Navigator. Here is a diagram of how this works:


You can download the sample project [zip file] to see this in action yourself. The project contains both Visual Studio 2005 and Visual Studio 2008 solutions. Those without Microsoft Visual Studio can use Visual C# 2008 Express Edition for free to work with the sample project.

Earlier we talked about using a C# class library to allow you to use the scripting functionality of Solid PDF Tools Scan to PDF from the command line. We use this class again to parse out the command line arguments we need to convert the pages into image files:


  Arguments CommandLine = new Arguments(args);‍
  if (CommandLine["f"] == null)‍
  {
    ShowUsage();‍
    return -1;
  }‍
  else
    pdfFile = CommandLine["f"];‍

  if (CommandLine["p"] != null)‍
    password = CommandLine["p"];

‍  if (CommandLine["o"] == null)
  {‍
    ShowUsage();
    return -2;‍
  }
  else
    outputfolder = CommandLine["o"];

‍  // Note: We default to 96 dpi if the parameter was not provided.
  if (CommandLine["d"] != null)‍
    dpi = Convert.ToInt32(CommandLine["d"]);

  if (CommandLine["t"] != null)
  {‍
    switch (CommandLine["t"].ToUpper())
    {‍
      case "TIF":
      case "TIFF":‍
        imagetype = ImageType.TIFF;
        break;‍
      case "BMP":
        imagetype = ImageType.BMP;‍
        break;
      case "JPEG":‍
      case "JPG":
        imagetype = ImageType.JPG; ‍
      break;
      case "PNG":‍
      default:
        imagetype = ImageType.PNG;‍
        break;
    }‍
  }

  if (CommandLine["r"] != null)
  {‍
    pagerange = CommandLine["r"];
  }‍

  DoConversion(pdfFile, password, outputfolder, dpi, pagerange, imagetype);‍

The code above takes care of setting up the arguments to hand off to DoConversion. So lets say we have a pdf file at c:\mypdfs\pdftest.pdf that is encrypted with a user password of "mypassword" and we want to make JPEG images of pages 1-5, 7, 8 with a dpi of 127 and put these images in c:\myimages. The commandline would look like this:

PDFtoImage.exe -f:c:\mypdfs\pdftest.pdf -p:mypassword -o:c:\myimages -d:127
-t:JPG -r:1-5,7,8


Note: -p -d -t and -r are optional. No password is used if -p is missing. DPI will default to 96, and image type will default to PNG. If -r is missing, all pages will be used to make images.

The DoConversion function is the meat of the project. First we set the trial license:

  // Setup the license
  SolidFramework.License.ActivateDeveloperLicense();

It then loads the PDF file with password if supplied:

  // Load up the document
  SolidFramework.Pdf.PdfDocument doc =
    new SolidFramework.Pdf.PdfDocument(file, password);

  doc.Open();

After the document is open, we check to see if the output folder exists, and if it doesn't, we create it:

  // Setup the outputfolder
  if (!Directory.Exists(folder))
  {
    Directory.CreateDirectory(folder);
  }
  // Setup the file string.
  string filename = folder + Path.DirectorySeparatorChar +
    Path.GetFileNameWithoutExtension(file);

Now walk the Pages dictionary and finds the page items by following the references.

  // Get our pages.
  List<SolidFramework.Pdf.Plumbing.PdfPage> Pages =
    new List<SolidFramework.Pdf.Plumbing.PdfPage>(doc.Catalog.Pages.PageCount);

  SolidFramework.Pdf.Catalog catalog =
    (SolidFramework.Pdf.Catalog)SolidFramework.Pdf.Catalog.Create(doc);

  SolidFramework.Pdf.Plumbing.PdfPages pages =
    (SolidFramework.Pdf.Plumbing.PdfPages)catalog.Pages;

  ProcessPages(ref pages, ref Pages)

Then if a page range is specified, parse the argument into page number integers. For each page that is specified, or all if not specified.

  // Check for page ranges
  PageRange ranges = null;
  bool bHaveRanges = false;
  if (!string.IsNullOrEmpty(pagerange))
  {
    bHaveRanges = PageRange.TryParse(pagerange, out ranges);
  }

  if (bHaveRanges)
  {
    int[] pageArray = ranges.ToArray();
    foreach (int number in pageArray)
    {
      CreateImageFromPage(Pages[number], dpi, filename, number, extension, format);
      Console.WriteLine(string.Format("Processed page {0} of {1}", number,
      Pages.Count));
    }
  }
  else
  {
    // For each page, save off a file.
    int pageIndex = 0;
    foreach (SolidFramework.Pdf.Plumbing.PdfPage page in Pages)
    {
      // Update the page number.
      pageIndex++;

      CreateImageFromPage(page, dpi, filename, pageIndex, extension, format);
      Console.WriteLine(string.Format("Processed page {0} of {1}", pageIndex,
      Pages.Count));
    }
  }

We load each requested Page object and request a bitmap from that object. We then request that the bitmap object save itself to a file in the output directory with the requested ImageFormat type.

  private static void   CreateImageFromPage(SolidFramework.Pdf.Plumbing.PdfPage page,
    int dpi, string filename, int pageIndex, string extension,
    System.Drawing.Imaging.ImageFormat format)
  {
    // Create a bitmap from the page with set dpi.
    Bitmap bm = page.DrawBitmap(dpi);

    // Setup the filename.
    string filepath = string.Format(filename + "-{0}.{1}", pageIndex, extension);
    // If the file exits already, delete it. I.E. Overwrite it.
    if (File.Exists(filepath))
      File.Delete(filepath);

    // Save the file.
    bm.Save(filepath, format);

    // Cleanup.
    bm.Dispose();
  }

And there you have it. The requested images should have been created in the specified output directory. Since we are using the free developer trial license, each page image will have a watermark at the bottom if the page. To remove this watermark, read more about an annual license for the Solid Framework Tools Edition here ($250 or $500 per year depending on distribution, no royalties).

Have any thoughts that you'd like to share? Please contact us with your feedback.

Friday, August 28, 2009

App Domain Switches and Solid Framework

It has come to our attention that there is an issue with Solid Framework finding its support files when 3rd party assemblies are being used. The problem manifests itself as "Cannot find framework.dll" exception.

To work around this issue your license call, or instance of the LicenseCollection Object should be placed at the very beginning of your application. This license call should happen before any other 3rd party assembly is called.

The 3rd party assemblies can change the App Domain and then the call to Solid Framework fails. It looks within the App Domain searching for its support resources and when it doesn’t find them it assumes they have already been extracted and tries to load them.

We have tracked this down with Oracle and other assemblies and fixed the bug. We should be releasing a new version of Solid Framework sometime in the next week.

Monday, August 24, 2009

Extracting Solid Framework support files.

Developers may need to extract the support files in Solid Framework for a couple of reasons.

  • To use the native C++ interface
  • Running scripts with SolidScript.exe
To facilitate this issue, we have uploaded a small console app that works with Solid Framework version 225 or greater here. Place the exe anywhere you like and run it with 2 parameters. The first parameter is the full path to Solid Framework.dll, and the second parameter is the path to where you want the extracted files to be placed.

Example:

ExtractFramework.exe "c:\development\Solid Framework\SoldFramework.dll" "d:\My Files\Framework"

This will extract the support files from SolidFramework.dll sitting in c:\development\Solid Framework to the location d:\My Files\Framework.

Note: We wrapped both paths with quotes on the command line because of spaces in the folder names. If your path has spaces, you should also use quotes.

Wednesday, July 1, 2009

Solid Framework now does PDF/A

Solid Documents provides a free online PDF/A Validation service that uses our recently released Solid Framework v6 SDK behind the scenes. Solid Framework is now available through an enterprise licensing model. The Tools and Professional levels include PDF/A Validation and PDF to PDF/A conversion functionality.

The PDF/A Competence Center has a test suite for validating PDF/A Validators called the Isartor Test Suite.

Evaluate for Yourself

An easy way to test drive our PDF/A Validation technology is to download the Isartor Test Suite (4MB ZIP) and then simply submit this ZIP file to our online PDF/A (ISO 19005 -1) validation service.

The online service will validate all 205 files in the ZIP and e-mail you an XML report, in Open Compliance Report format, containing the PDF/A violations found in these file. All of the 205 files should exhibit errors, including the Isartor Test Suite Manual.

1. Download isartor-pdfa-2008-08-13.zip from http://www.pdfa.org/
2. Go to http://www.validatepdfa.com/ and step through the wizard.
3. Attach isartor-pdfa-2008-08-13.zip to the e-mail.
4. Sit back and wait for the response from our free validation service.
5. Examine the report to confirm that our PDF/A Validator is 100% compliant.

Tuesday, January 15, 2008

Reading and Writing Secure PDF Files

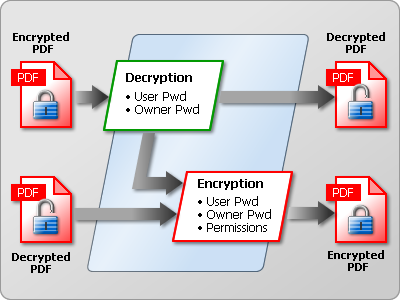
One of the most common unattended batch PDF processes is to apply standardized access permissions and encryption to all documents. This may be done as a stand-alone utility that uses a watched folder on your network or integrated into your document workflow system.

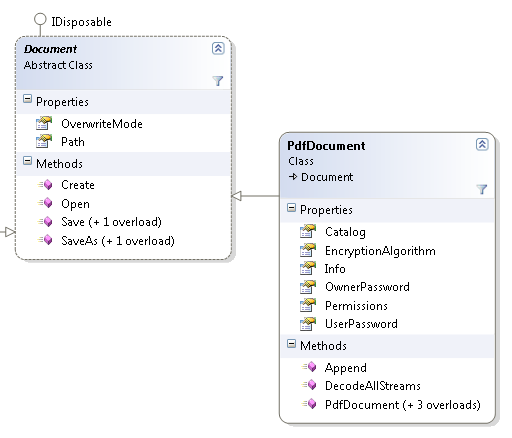
You can use PdfDocument to open an encrypted PDF file, assuming that you know either the owner or user password. With a Solid Framework Tools license you can write changes back to the PDF which means you can add, remove or alter the security settings.

Add or Remove PDF Security

The PdfDocument class is all you need in order to master PDF security using Solid Framework. The steps involved are:
  • Open() - opening an existing PDF file (with or without a password)
  • EncryptionAlgorithm - choosing an encryption algorithm
  • OwnerPassword and UserPassword - setting new passwords
  • Permissions: setting user access permissions for the PDF file
  • Save() or SaveAs() - saving the modified PDF file
PdfDocument and Document classes

Open
As usual with these examples, please start by getting one of the samples like pdfcreator working. That will ensure that your license is working. Then we'll remove the code in the body of the Main method. Keep the License.Import(..) call.

Make sure you have the following using statements:

using SolidFramework;
using SolidFramework.Plumbing;using SolidFramework.Pdf;
using SolidFramework.Pdf.Plumbing;


For convenience, we can still use the InputPath and OutputPath from JobSettings. Edit JobSettings to make InputPath point to your existing PDF file. Make OutputPath point to where you want the resulting PDF file stored.

Create a new PdfDocument as follows:

PdfDocument document = new PdfDocument();

Set the properties including the owner password if the file is protected. The user password would give you readonly access to the file. To modify it, you need to use the owner password.

document.Path = JobSettings.Default.InputPath;document.OwnerPassword = "owner";

And then load the file.

document.Open();

EncryptionAlgorithm

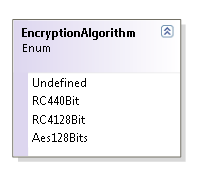
If the file was already secure then its EncryptionAlgorithm will be set. You have several choices but you cannot leave this property Undefined if you wish to use password security.


PDF encryption algorithm
RC440Bit is of legacy interest only. In the past there were performance issues and there are also export compliance issues related to the more secure 128 bit algorithms. AES is a more recent addition to the PDF standard than RC4 and RC4 is still a proprietary algorithm owned by RSA. It is also the most commonly used algorithm.

Make your choice and set it like this:


document.EncryptionAlgorithm = EncryptionAlgorithm.RC4128Bit;

OwnerPassword and UserPassword
There are two levels of access to a PDF file:

  • Owner - the author (owner) has this level of access to modify the document permissions allowed to users. The owner always has all permissions.
  • User - the user's permissions are restricted by the owner.
We'll set both passwords so that we can examine all the security features. It is possible to create PDF files with only the owner password. Obviously you will want to use much stronger passwords that include the odd number or special character. Remember that passwords are also case sensitive.

document.OwnerPassword = "newowner";
document.UserPassword = "user";

Permissions

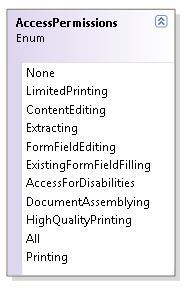
PDF access permissions
These values can be or'd to give any combination of permissions to your users like this:
document.Permissions =
AccessPermissions.Printing | AccessPermissions.AccessForDisabilities;
If you set the UserPassword then users will need to enter this password when they open the PDF file. After that, the restrictions based on AccessPermissions apply.
If you leave the UserPassword blank then users will not need to enter any password but the document will still be restricted by AccessPermissions. Opening the document and entering the owner password will give full permissions to the owner.

Save or SaveAsNow it is time to save your PDF document to a new file. Assuming your OutputPath is set to a good location, you just need two more lines of code. Without ForceOverwrite there will be an exception thrown if the file already exists.
document.OverwriteMode = OverwriteMode.ForceOverwrite;
document.SaveAs(JobSettings.Default.OutputPath);

Complete Sample Snippet

// createPdfDocument document = new PdfDocument();

// set
document.Path = JobSettings.Default.InputPath;
document.OwnerPassword = "owner";

// call
document.Open();

// set
document.EncryptionAlgorithm = EncryptionAlgorithm.RC4128Bit;
document.OwnerPassword = "newowner";
document.UserPassword = "user";
document.Permissions = AccessPermissions.Printing | AccessPermissions.AccessForDisabilities;
document.OverwriteMode = OverwriteMode.ForceOverwrite;

// call
document.SaveAs(JobSettings.Default.OutputPath);

Thursday, December 27, 2007

Better PDF Creation from Word

ShellPrintProvider vs WordPrintProvider
The starting point for many developers using Solid Framework is the simple pdfcreator sample. This tiny program demonstrates the shortest path to creating PDF files from just about any document on a Windows system.

ShellPrintProvider
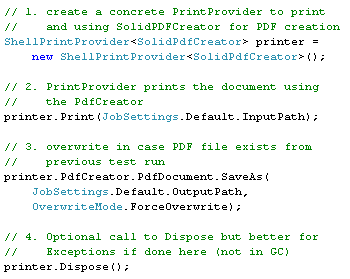
Using ShellPrintProvider, three or four statements are all that is needed to create a PDF file:
ShellPrintProvider sample code

The ShellPrintProvider uses Windows Explorer to launch the application associated with the file type you are trying to convert. This only works if the application in question supports the shell “print” verb. In addition, print providers can use any of the supported Solid Documents PDF creation printer drivers. This example requires the Solid PDF Creator printer driver to be installed (but does not require a Solid PDF Creator license).

Advantages of ShellPrintProvider:

  • works with most Windows applications capable of printing
  • relies on Explorer Shell commands rather than proprietary APIs which may vary with different versions of applications
Disadvantages of ShellPrintProvider

  • no control over the UI of the Windows application (even Word can get stuck on a simple print margins warning dialog)
  • limited to what can be printed (no access to original Document Properties for example)

WordPrintProvider

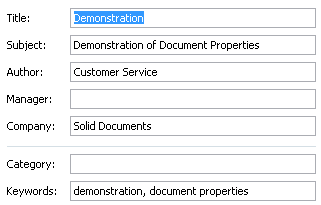
WordPrintProvider is a custom PrintProvider designed to work directly with Microsoft Word via the Office API. Since Word is being driven through an API this gives Solid Framework much more control over the process. Failures can be communicated as exceptions to your program rather than UI warnings to the end user. In addition, Word can be used to examine the original document and provide support for features that would not be possible by simple printing such as the original Document Properties. To illustrate this, use File Properties in Word to add properties to your Word test document like this:


Document Properties in Word

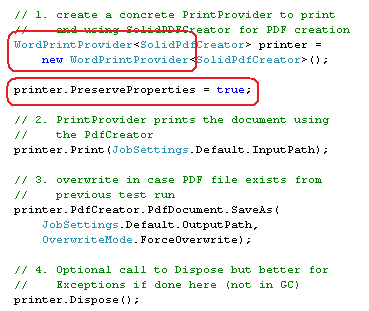
Now make two simple changes to the original pdfcreator sample:

  • replace the two instances of ShellPrintProvider with WordPrintProvider
  • add printer.PreserveProperties = true;

    WordPrintProvider sample code

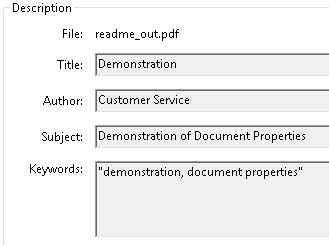
When you run the sample application and then examine File Properties for the resulting PDF file in Acrobat Reader you should see that your Document Properties from the original Word document have been preserved. You should also notice a lot less UI “noise” from Microsoft Word during the creation process.

Document Properties in PDF